Door
Scuff Trim Replacement
| •
|
Put on gloves to protect your
hands. |
| •
|
When prying with a flat-tip
screwdriver, wrap it with protective tape to prevent
damage. |
| •
|
Take care not to bend or scratch the
trim and
panels. | |
| 1. |
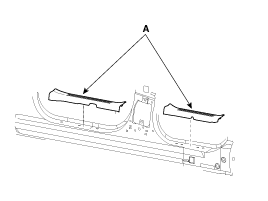
Remove the front door scuff trim
(A).
|
| 2. |
Installation is the reverse of
removal.
| • |
Replace any damage
clips. | | |
Front
Pillar Trim
| •
|
Put on gloves to protect your
hands. |
| •
|
When prying with a flat-tip
screwdriver, wrap it with protective tape to prevent
damage. |
| •
|
Take care not to bend or scratch the
trim and
panels. | |
| 1. |
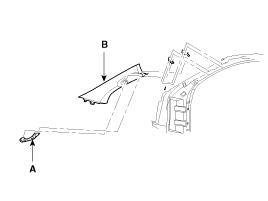
Remove the get on off grip
(A). |
| 2. |
Remove the front pillar trim
(B).
|
| 3. |
Installation is the reverse of
removal.
| • |
Replace any damage
clips. | | |
Cowl
Side Trim Replacement
| •
|
Put on gloves to protect your
hands. |
| •
|
When prying with a flat-tip
screwdriver, wrap it with protective tape to prevent
damage. |
| •
|
Take care not to bend or scratch the
trim and
panels. | |
| 1. |
Remove the front door scuff
trim. |
| 2. |
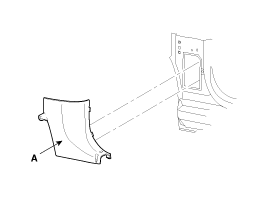
Remove the cowl side trim (A).
|
| 3. |
Installation is the reverse of
removal.
| • |
Replace any damage
clips. | | |
Center
Pillar Trim Replacement
| •
|
Put on gloves to protect your
hands. |
| •
|
When prying with a flat-tip
screwdriver, wrap it with protective tape to prevent
damage. |
| •
|
Take care not to bend or scratch the
trim and
panels. | |
| 1. |
Remove the front seat belt lower
anchor. |
| 2. |
Remove the front door scuff
trim. |
| 3. |
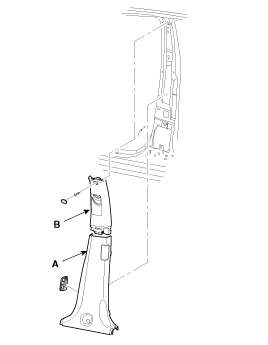
Remove the center lower pillar lower
trim(A). |
| 4. |
Remove the center upper pillar upper trim
(B).
|
| 5. |
Installation is the reverse of
removal.
| • |
Replace any damage
clips. | | |
Rear
Pillar Trim Replacement
| •
|
Put on gloves to protect your
hands. |
| •
|
When prying with a flat-tip
screwdriver, wrap it with protective tape to prevent
damage. |
| •
|
Take care not to bend or scratch the
trim and
panels. | |
| 1. |
Remove the rear pillar trim
(A).
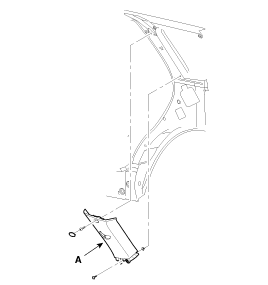
|
| 2. |
Installation is the reverse of
removal.
| • |
Replace any damage
clips. | | |
Luggage
Side Trim Replacement
| •
|
Put on gloves to protect your
hands. |
| •
|
When prying with a flat-tipped
screwdriver, wrap it with protective tape to prevent
damaged. |
| •
|
Take care not to bend or scratch the
trim and
panels. | |
| 2. |
Remove the rear seat belt lower
anchor. |
| 3. |
After loosening the mounting screws, then
remove the luggage side trim. |
| 4. |
Installation is the reverse of
removal.
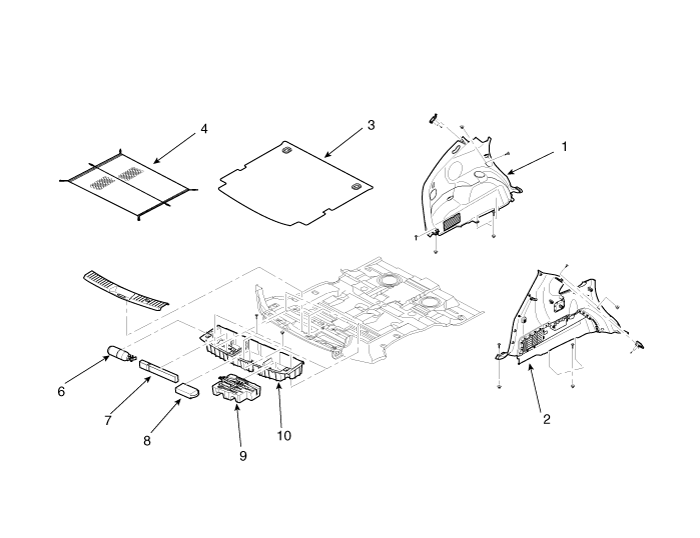
1. Luggage side
trim
2. Luggage side
trim
3. Luggage floor mat
|
4. Luggage floor
net
5. Rear transverse
trim
6.
Extinguisher
|
7. Tripod
8. Aid
9.
OVM tool
10. Luggage floor
box
|
|